
Whether you’re setting up a caravan, camper trailer, or need reliable power connections for your 4WD accessories, understanding how to properly install and maintain Anderson plugs is essential for any vehicle owner. This comprehensive guide covers everything you need to know about Anderson plug installation, from selecting the right components to keeping your connections in top condition for years of reliable service.
How to Install an Anderson Plug
Gather Your Tools and Materials
Before starting your Anderson plug installation, you’ll need to collect the right tools and materials for the job. At minimum, you’ll require an Anderson plug housing (typically 50 amp for most automotive applications), appropriately rated terminals, quality automotive-grade cable, a crimping tool designed for Anderson terminals, wire strippers, and heat shrink tubing. For a professional finish, you’ll also want a multimeter to test your connections and cable ties to secure your wiring neatly.
Selecting the correct cable size is critical to your installation’s success and safety. For most 50 amp Anderson plug setups, 6mm² (or 8 B&S) cable is the standard choice, though longer cable runs may require thicker gauge wire to prevent voltage drop. Always check your specific application’s current requirements and choose cable rated to handle the maximum expected load with some margin for safety.
Preparing the Cables
Start by measuring and cutting your cables to the required length, leaving a little extra to account for any routing adjustments. Strip approximately 10-12mm of insulation from the end of each cable, being careful not to nick or damage any of the copper strands. Damaged strands can reduce the cable’s current-carrying capacity and create potential failure points in your connection.
If you’re working with tinned cable, which is common in marine and high-quality automotive applications, the preparation process is the same. Tinned cable offers better corrosion resistance, making it an excellent choice for vehicles that may be exposed to water crossings or coastal conditions. Regardless of cable type, ensure the exposed copper is clean and free from oxidation before proceeding with terminal crimping.
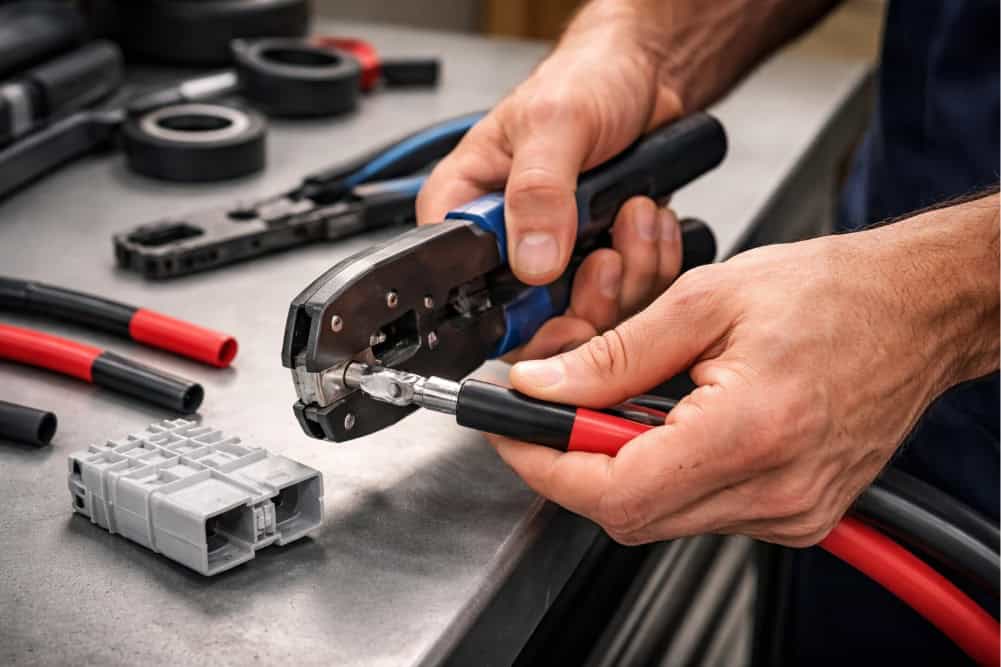
Crimping the Terminals
Proper crimping is arguably the most important step in Anderson plug installation, as a poor crimp can lead to high resistance, heat buildup, and eventual connection failure. Insert the stripped cable end fully into the terminal barrel, ensuring all strands are contained within the crimping area. Position the terminal in your crimping tool and apply firm, even pressure to create a solid mechanical and electrical connection.
After crimping, inspect the terminal carefully. The crimp should be tight and uniform, with no loose strands visible. Give the cable a firm tug to ensure it won’t pull free from the terminal. A quality crimp will actually be stronger than the cable itself, meaning the cable would break before the crimp fails. If you have any doubts about your crimp quality, cut it off and start again, as a dodgy crimp is not worth the risk.
For added protection and longevity, slide a piece of heat shrink tubing over the connection before inserting the terminal into the housing. This provides strain relief and prevents moisture from wicking into the cable through the terminal connection. Use a heat gun to shrink the tubing evenly, being careful not to overheat and damage the cable insulation.
Assembling the Anderson Plug
With your terminals properly crimped, you’re ready to assemble the Anderson plug. The housing consists of two identical halves that interlock to form the complete plug. Each half contains a slot for one terminal, with the positive and negative positions typically marked on the housing. Pay careful attention to polarity, as reversing the connections can damage sensitive electronic equipment.
Insert each terminal into its respective housing half by sliding it in until you hear and feel it click into place. The terminal’s spring retention clip should engage with the housing, holding it securely. Test the terminal by gently pulling on the cable; it should not move or come free. Once both terminals are seated, slide the two housing halves together until they lock.
The assembled plug should feel solid and the two halves should sit flush against each other. If there’s any gap or the halves don’t align properly, remove the terminals and check that they’re fully seated. An improperly assembled plug may not make good contact with its mating connector, leading to intermittent connections or overheating under load.
Mounting and Wiring
The location of your Anderson plug mounting point depends on your specific application. For towing setups, the plug is typically mounted at the rear of the vehicle, often near the towbar or on a dedicated mounting bracket. For auxiliary battery systems or dual battery setups, you may need Anderson plugs in multiple locations, such as the engine bay for charging connections and the rear for powering accessories.
When routing your cables, keep them away from heat sources like exhaust systems and moving parts that could cause chafing. Use grommets when passing cables through metal panels to prevent the sharp edges from cutting through the insulation over time. Secure cables at regular intervals with cable ties or proper automotive cable clips, ensuring there’s no excess slack that could catch on anything.
At the vehicle end of your installation, you’ll need to connect to your power source, whether that’s the main battery, an auxiliary battery, or a dedicated circuit. Always include an appropriately rated fuse or circuit breaker as close to the power source as possible. For a 50 amp Anderson plug circuit, a 60 amp fuse provides protection while allowing for brief current spikes during high-demand situations.
Anderson Plug Maintenance
Regular Inspection Routine
Establishing a regular inspection routine is the key to maintaining reliable Anderson plug connections. Before each trip, take a moment to visually inspect your plugs for any signs of damage, corrosion, or contamination. Look for cracks in the housing, bent or damaged terminals, and any discolouration that might indicate overheating. Catching small issues early prevents them from becoming major problems on the road.
Check that the plug halves still lock together firmly and that there’s no excessive play in the connection. Over time, the locking mechanism can wear, leading to loose connections that may disconnect unexpectedly or create intermittent contact. If you notice the connection becoming loose, it’s time to replace the affected plug before it causes issues during your travels.
Also inspect the cables leading to and from your Anderson plugs. Look for any signs of chafing, cracking in the insulation, or damage from heat exposure. Pay particular attention to areas where cables pass through panels or near moving parts, as these are common failure points. Any damaged cable should be repaired or replaced promptly to prevent short circuits or fire hazards.
Cleaning Your Anderson Plugs
Keeping your Anderson plug contacts clean ensures optimal electrical conductivity and prevents the buildup of resistance that can cause heating issues. For routine cleaning, use a dry cloth or compressed air to remove dust and debris from the plug contacts. Avoid using water or liquid cleaners inside the plug housing, as trapped moisture can promote corrosion.
For more thorough cleaning, electrical contact cleaner spray is your best option. This solvent-based cleaner evaporates quickly without leaving residue and is safe for use on electrical connections. Spray a small amount onto the contacts and work it in by connecting and disconnecting the plug several times. Wipe away any excess with a clean, lint-free cloth.
If you notice oxidation or light corrosion on your terminals, you can carefully clean them with a fine abrasive pad or specialised contact cleaning tool. Be gentle to avoid removing excessive material from the contacts, as this can affect the connection quality. After cleaning corroded contacts, apply a thin film of dielectric grease to help prevent future oxidation.
Protecting Against Corrosion
Corrosion is the enemy of reliable electrical connections, particularly for vehicles used in wet conditions or coastal areas where salt exposure is common. Applying dielectric grease to your Anderson plug contacts creates a barrier against moisture and prevents oxidation while still allowing good electrical contact between mating surfaces.
When your Anderson plug is not in use, always fit the dust cap if your plug came with one. If you don’t have a dust cap, consider purchasing one or making a simple cover to keep out dirt, dust, and moisture. Some vehicle owners keep a small plastic bag secured with a rubber band over unused plugs as a simple but effective protective measure.
For vehicles regularly exposed to harsh conditions, consider upgrading to Anderson plugs with covers or using mounting solutions that provide some protection from the elements. There are various aftermarket mounting brackets available that include hinged covers or recessed mounting positions that shield the plug from direct exposure to water and debris.
Testing Your Connections
Periodically testing your Anderson plug connections with a multimeter helps identify potential problems before they cause failures. Set your multimeter to measure DC voltage and connect it across the Anderson plug while under load. Compare this reading to the voltage at your battery; any significant difference indicates resistance in the circuit that should be investigated.
You can also perform a resistance test by measuring directly across the Anderson plug connection with your multimeter set to the ohms scale. A good connection should show minimal resistance, typically less than 0.1 ohms. Higher readings suggest dirty contacts, poor crimps, or corroded terminals that need attention.
For circuits that carry significant current, an infrared thermometer is a useful tool for checking connection temperature during operation. Measure the temperature of your Anderson plug and compare it to the ambient temperature. Some warming is normal under load, but if the plug becomes hot to touch or shows a temperature rise significantly above the surrounding components, there’s likely a problem with the connection that requires immediate attention.
Common Anderson Plug Problems and Solutions
Overheating Connections
Overheating is one of the most serious issues that can affect Anderson plug installations, as it can lead to melted housings, damaged cables, and in extreme cases, electrical fires. The primary cause of overheating is high resistance in the connection, which can result from poor crimps, dirty or corroded contacts, loose connections, or undersized cables for the application.
If you notice your Anderson plug running hot, stop using it immediately and investigate the cause. Check all crimped connections for quality and remake any that look questionable. Clean the contacts thoroughly and ensure the plug halves are mating correctly with good contact pressure. Verify that your cable size is appropriate for the current being carried over the distance involved.
Repeatedly connecting and disconnecting Anderson plugs under load can also contribute to contact damage and overheating. Always switch off or disconnect the power source before mating or separating Anderson plugs to prevent arcing that can pit and damage the contact surfaces. If your contacts show signs of arc damage, replace them before they cause further problems.
Intermittent Connections
Intermittent electrical connections can be frustrating to diagnose and can cause unexpected behaviour in connected equipment. In Anderson plug installations, intermittent issues are often caused by loose terminals, worn housings, or contaminated contacts. The vibration and movement experienced during driving can cause marginal connections to make and break contact repeatedly.
Start troubleshooting intermittent connections by checking that your terminals are fully seated in the housing and that the housing halves lock together properly. If the plug shows signs of wear or the locking mechanism is loose, replacement is usually the best solution. Attempting to modify or repair worn housings often leads to further problems down the track.
Contamination from road grime, dust, or moisture can also cause intermittent connections, particularly if the plug is mounted in an exposed location. A thorough cleaning with electrical contact cleaner often resolves these issues. If problems persist after cleaning, examine the contacts closely for pitting, corrosion, or physical damage that might require terminal replacement.
Physical Damage
Anderson plugs mounted in exposed locations are susceptible to physical damage from road debris, impacts during recovery operations, or accidental contact with obstacles. Cracked or broken housings should be replaced immediately, as they may not maintain proper contact pressure and can allow moisture and contamination to reach the terminals.
Bent or damaged terminals can prevent proper connection and may cause overheating due to reduced contact area. While minor bending can sometimes be corrected, it’s generally safer to replace damaged terminals rather than risk an unreliable connection. The cost of new terminals is minimal compared to the potential consequences of a failed connection in the field.
To prevent physical damage, consider the mounting location carefully during installation. Recessed mounting or protective covers can significantly reduce exposure to damage. If your plug must be mounted in a vulnerable position, regular inspection becomes even more important to catch any damage early.
Choosing the Right Anderson Plug for Your Application
Sizing Considerations
Anderson plugs come in various sizes, with the 50 amp version being the most common for automotive and caravan applications. However, this doesn’t mean all 50 amp plugs are equal or suitable for every installation. Understanding the actual current requirements of your system helps you choose the right components and ensure reliable operation.
For most auxiliary battery charging setups and moderate accessory loads, a standard 50 amp Anderson plug with 6mm² cable provides plenty of capacity. Higher current applications, such as high-output alternator charging systems or running large inverters, may benefit from using larger cable even with the same 50 amp plug, or stepping up to a higher-rated connector system altogether.
Consider not just your current needs but also potential future upgrades when planning your installation. It’s much easier to install appropriately sized components from the start than to upgrade later. A slightly over-specified system will run cooler and last longer than one operating at its limits.
Quality Matters
Not all Anderson plugs are created equal, and the quality of components you choose directly affects the reliability and longevity of your installation. Genuine Anderson Power Products connectors are manufactured to strict standards and offer consistent quality, though they come at a premium price. Quality aftermarket alternatives exist, but be wary of extremely cheap options that may not meet the same standards.
Signs of poor-quality Anderson plugs include loose-fitting terminals, housings that don’t lock together securely, and terminals that don’t crimp properly. These issues can lead to connection problems, overheating, and premature failure. Spending a little more on quality components from reputable suppliers is worthwhile considering the critical role these connections play in your electrical system.
When purchasing components, buy from established automotive electrical suppliers who can provide guidance and stand behind their products. Avoid generic electrical components from unknown sources, particularly for high-current applications where quality really matters.
Need Help With Anderson Plug Installation?
Proper Anderson plug installation and maintenance ensures reliable power connections for your caravan, camper, or 4WD accessories, keeping you powered up wherever your adventures take you. While many vehicle owners successfully complete their own installations, professional assistance guarantees optimal results and peace of mind.
As experienced auto electricians in Auckland, Eurosparx can help you with all aspects of Anderson plug installation and maintenance. Whether you need a simple plug fitted or a complete dual battery system with multiple connection points, our team has the expertise to deliver a professional, reliable installation. Contact us today by calling 09 218 7789 to discuss your requirements.