Wiring a 7-pin trailer plug correctly is essential for ensuring your trailer’s lights, brakes, and auxiliary functions work safely and reliably on New Zealand roads. This guide will walk you through the complete process of wiring a 7-pin trailer plug, covering everything from understanding the pin configuration to making secure connections that will last.
Understanding the 7-Pin Trailer Plug Configuration
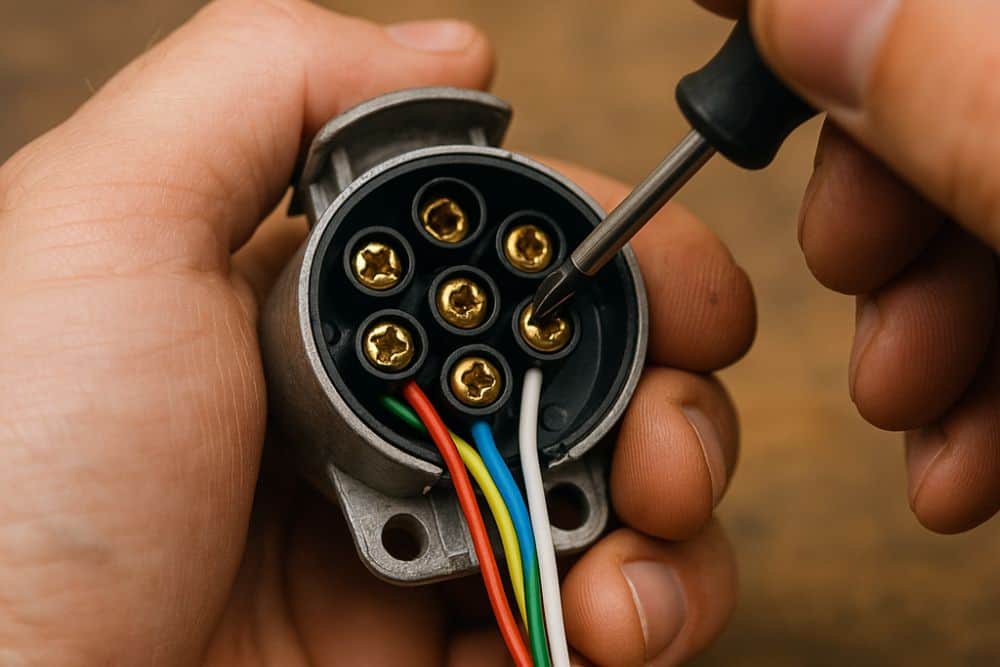
The standard 7-pin flat trailer plug used throughout New Zealand and Australia follows a specific wiring configuration that you must adhere to for proper function and legal compliance. Each pin serves a distinct purpose, and getting even one connection wrong can result in faulty lights or, worse, brake failure. The seven pins are arranged in a flat configuration, and understanding their layout is the first step to successful wiring.
Pin 1 is designated for the left indicator and brake light, carrying a yellow wire.
Pin 2 handles the reverse lights and uses a black wire.
Pin 3 is the earth or ground connection, which is critical for completing all circuits, and uses a white wire.
Pin 4 connects to the right indicator and brake light with a green wire.
Pin 5 powers the electric brakes using a blue wire.
Pin 6 powers the tail, clearance, and number plate lights (both sides) with a brown wire.
Finally, Pin 7 is often used for auxiliary functions (e.g., interior lights or battery charge) with a red wire.
This follows the Australian/New Zealand 7-pin flat plug standard (AS 4177.5-2004). Memorising this configuration or keeping a reference chart handy will prevent costly mistakes during installation.
Gathering the Required Tools and Materials
Before beginning the wiring process, make sure you have all necessary tools and materials on hand. You will need a 7-pin trailer plug and socket set, appropriate automotive cable (typically 5-core or 7-core depending on your trailer’s requirements), wire strippers, crimping tools, electrical tape, heat shrink tubing, and a multimeter for testing connections. Having a soldering iron is optional but recommended for creating more durable connections that can withstand the vibrations and weather exposure common in trailer use.
Quality matters significantly when selecting your materials. Choose marine-grade or automotive-grade cable that can withstand moisture, temperature fluctuations, and physical wear. Cheap cable with inadequate insulation will deteriorate quickly, especially in Auckland’s humid coastal environment. Similarly, invest in a quality plug and socket with solid brass pins rather than cheaper alternatives that corrode easily. The small additional cost will save you from repeated repairs and potential roadside breakdowns.
Preparing the Cable and Plug
Start by cutting your trailer cable to the appropriate length, allowing enough slack to account for turns and vehicle movement without creating excess cable that could drag or snag. Strip approximately 50-60mm of the outer sheath from the cable end, being careful not to damage the individual wire insulation beneath. Once exposed, separate the individual wires and strip about 5-7mm of insulation from each wire end. If your cable contains more cores than you need, identify which wires you will use according to the standard colour coding and tape back any unused wires to prevent short circuits.
Prepare the plug housing by unscrewing or opening it according to the manufacturer’s design. Most 7-pin plugs have a cable grip or clamp that secures the outer sheath, preventing strain on the individual wire connections. Thread the cable through this grip before making any connections, as you will not be able to add it afterwards. Slide heat shrink tubing onto each wire before making connections if you plan to use this additional protection method.
Making the Pin Connections
Connect each wire to its corresponding pin terminal within the plug, following the standard configuration outlined earlier. If your plug uses screw terminals, twist the exposed wire strands tightly together, form a hook shape, wrap it around the screw in a clockwise direction, and tighten securely. The clockwise wrapping prevents the wire from working loose as you tighten the screw. For crimp-style terminals, insert the wire fully into the crimp connector and use a proper crimping tool to create a solid mechanical connection. Avoid using pliers as a substitute for a crimping tool, as they rarely create adequate pressure for a reliable connection.
For the most durable connections, particularly in the harsh marine environment common around Auckland, consider soldering your connections after crimping. This creates a gas-tight seal that prevents corrosion from moisture infiltration. Apply heat shrink tubing over each connection and use a heat gun to shrink it tightly, providing both insulation and mechanical protection. Take special care with the earth wire (Pin 3), as a poor earth connection is the most common cause of trailer lighting problems. Ensure this connection is clean, tight, and corrosion-free.
Securing the Cable and Housing
Once all pin connections are complete, tighten the cable grip or clamp firmly on the outer cable sheath. This strain relief is crucial because it prevents the individual wire connections from bearing the mechanical stress of cable movement, which would otherwise cause them to break or work loose over time. Make sure the grip is tight enough to hold the cable firmly but not so tight that it crushes the cable or damages the outer sheath.
Carefully arrange the wires inside the plug housing so they sit neatly without crossing or putting strain on any connections. Close the plug housing and secure it according to the manufacturer’s design, whether that involves screws, clips, or a threaded collar. Some plugs include rubber gaskets or seals that provide water resistance. Make sure these are properly positioned before closing the housing. Apply a small amount of dielectric grease to the pins and socket connections to further protect against corrosion, which is particularly important in coastal areas.
Testing Your Connections
Before connecting your trailer to the vehicle, test each circuit with a multimeter to verify proper continuity and function. Set your multimeter to continuity or resistance mode and check each pin against the earth pin. You should see an open circuit (infinite resistance) when the corresponding light or function is off. Connect the plug to your vehicle’s socket and have someone operate each function (indicators, brake lights, tail lights, reverse lights) while you verify that the correct pins are receiving power and that all lights illuminate properly.
Pay particular attention to the brake light function on both sides, as these share pins with the indicators and must work correctly in all situations. Test the electric brake connection if your trailer is equipped with electric brakes by using a brake controller test function or multimeter to verify that Pin 6 is receiving the appropriate variable voltage signal. Check for any voltage present on the earth wire (Pin 3), which would indicate a fault in the grounding system. If you discover any issues during testing, disconnect the power, identify the problem connection, and rectify it before using the trailer on the road.
Common Wiring Mistakes to Avoid
One of the most frequent errors is reversing the left and right circuits, which causes indicators and brake lights to illuminate on the wrong side of the trailer. This creates a serious safety hazard and is illegal. Always double-check your connections against the standard pin configuration before closing the plug housing. Another common mistake is inadequate insulation between terminals, which can cause short circuits when wires touch inside the housing, leading to blown fuses or damaged vehicle wiring.
Many people also underestimate the importance of a solid earth connection. Using an undersized earth wire, making a loose connection, or relying on the trailer’s chassis for earthing without a proper dedicated earth wire often results in intermittent lighting problems that are frustrating to diagnose. In Auckland’s humid climate, corrosion can quickly degrade marginal connections, so always use the full specified earth wire and make sure every earth connection is clean and tight. Finally, avoid using inappropriate cable types such as household electrical cable or speaker wire, which lack the necessary insulation, flexibility, and durability for automotive applications.
Maintaining Your Trailer Plug Connection
Regular maintenance will extend the life of your trailer plug and prevent problems on the road. After each use, particularly if you have been near saltwater or in wet conditions, disconnect the plug and inspect it for signs of corrosion, damage, or water ingress. Wipe both the plug and socket dry and apply a light coating of dielectric grease or corrosion-inhibiting spray to the pins. Store the plug in a secure location when not connected, using a plug cover or dummy socket to keep dirt and moisture out.
Every few months, or before any long journey, perform a complete function test of all circuits. Check that all connections inside the plug remain tight and that no wires have chafed or become damaged. Look for any discolouration or melting of plastic components, which indicates excessive current draw or poor connections creating resistance and heat. Replace any damaged components immediately rather than attempting temporary repairs. The relatively small cost of a new plug is insignificant compared to the danger and inconvenience of trailer lighting failure on a busy motorway.
Need Help With Trailer Wiring?
Properly wiring a 7-pin trailer plug requires attention to detail and understanding of automotive electrical systems. While it is a task that capable DIY enthusiasts can complete, incorrect wiring poses serious safety risks and can damage your vehicle’s electrical system. As Auckland auto electricians, we can help you with all aspects of trailer plug wiring, from installation and testing to fault diagnosis and repairs. Contact our team today by calling 09 218 7789 to ensure your trailer electrical system is safe, legal, and reliable.